Sunday, August 11, 2013

Hidden vegetables!

Home on a Friday means baking something for the weekend and maybe give a new recipe a try, well it'd be rude not to, right?


So, as peaches are in season mixed with the fact I'd been watching a food programme which used sweet potato in a candy I thought I'd search for a recipe to use both these ingredients. Yes, I found one! 

A lovely friend lent me a cookery book, (like a hundred years ago and I've yet to give it back), which contains recipes for just such an occasion and hooray instructions to make Peach and Poppy Seed muffins was contained within! 

They were really simple to make and the finished result was really tasty, see below, I dare you not to salivate or dribble while looking at the picture! Oh and their gluten free too! (You're welcome!)

 
Now for the recipe....

Peach and Poppy Seed Muffins
(Taken from "Red Velvet Chocolate Heartache" by Harry Eastwood.)

Makes 9

2 free range eggs
120g caster sugar
200g peeled and finely grated sweet potato
100g white rice flour 
100g ground almonds
1 tablespoon poppy seeds
2 teaspoons baking powder
Half teaspoon bicarbonate of soda
Quarter teaspoon salt
3 small peaches cut into half centimetre cubes

You will also need 
12 hole muffin tray 
9 muffin cases

1. Preheat oven to 180c / 350f / gas mark 4 and line the muffin tray with the cases.
2. Whisk the eggs and sugar together until light and fluffy (this takes about 3 minutes).
3. Beat in (using a wooden spoon) the sweet potato, flour, ground almonds, poppy seeds, baking powder, bicarbonate of soda and salt until well mixed, don't over mix.
4. Fold in the cubes of peach, do this gently, don't over mix.
5. Fill the muffin cases right up to the top.
6. Bake for about 30 minutes.
7. Remove from oven onto a wire rack to cool.

Notes! 
I didn't have any rice flour so I used plain flour, obviously this makes them non gluten free but the use of plain flour didn't seem to affect the results.
I used a wooden spoon as instructed to mix in all the ingredients and then switched to a large metal spoon to fold in the peach pieces as this type of spoon cut through the mixture better.
I only had a 6 hole muffin tray so I used that, baked 6, left the rest of the mixture in the bowl then baked the remaining 3 while the 6 were cooling. 

Good warm or cold. I'm pretty sure warm with a scoop of vanilla ice cream would make a yummy dessert! Note to self....try this! 

GD*BG


Wednesday, July 17, 2013

Peach Popsicles!

....or ice lollies as we call them in Britain (but "ice lolly" didn't make for such a good blog post title!)

So the other morning while eating my breakfast I happened to be watching this show on the Food Network channel and Andy Bates visited this really great looking shop in Chelsea Market, NYC called People's Pops. (I am defo going there on my next visit!) A company that makes healthy-ish, interesting, alternative ice lollies. The show featured a brief outline of how they made their "roasted peach and ginger popsicle", looked pretty simple.....I could make that I thought, so I gave it a go!

First of all I bought 6 donut peaches, they're smaller than your standard peach so I figured 6 would give me a fair amount to work with once baked. I rinsed them under the tap - you never know where they may have been - put them in a roasting tin and baked them in the oven.


While these were cooking I made a ginger syrup, following the instructions featured in an earlier post on this blog, except using a 2 inch long piece of fresh ginger cut into thin slices rather than the rosemary.

After about 35 minutes in the oven the peaches smelled delish! I took that as a sign they were baked, so removed them from the oven and let them cool for a bit until they were cold enough to handle. Then I pulled them apart, removing the stones and stalks, and dropped the flesh, skins and all, into a mixing bowl.


Tipped the syrup in on top and mashed the whole lot with a fork to break up the peaches a bit. At this point Andy on the tv show said the ingredients were put in a blender, well I don't have a blender but I do have one of those soup blender wand things, so I used that to mix everything up to a purée. Then I transferred the whole lot to a glass jug, for the only reason that it would be easier to pour into the lolly moulds.


As you can see, the 6 peaches and bit of syrup made 1/2 a litre of lolly mixture! This filled all 4 of my moulds and I had spare, probably enough for one more lolly.

The moulds, topped right up as high as possible.


Then the stick lids went on and into the freezer overnight. 
The result.....


Ta-dah! One Roasted Peach and Ginger Popsicle. (Yep my moulds have a built in straw to ensure not a drop is wasted! Fancy!!) 

I'm telling you frozen roasted peaches on a hot day is the way ahead! 

note:

My only note is that I couldn't taste the ginger at all. Maybe next time I should grate the ginger before I add it to the syrup rather than slice it, getting as much juice out as possible? Or perhaps add tiny pieces of chopped up crystallised ginger for an added kick? Hmmm not sure, any advice?


Friday, February 22, 2013

Sneaker embroidery

And by that I mean I embroidered a picture of a sneaker not that I actually embroidered a sneaker! Though that's a thought!!

I have an hour (or longer) commute to work each day, 45mins of which is on one train so I have the chance to read or write or sometimes draw. A while back I decided to draw shoes worn by commuters - quick sketches of interesting footwear an then sometimes, when I got home or in the return journey work into them in more detail. Which resulted in the sketch you can see below.

Then, because I like to have a craft or sewing project on the go at all times I decided to duplicate it but as an embroidery. This gave me the opportunity to experiment with new stitches and threads, I think it turned out pretty well.

GD*BG


Tuesday, February 5, 2013


Birthday Bunting!


So... my daughter, Olympia, just turned 1!!

A 1 year old isn’t really “into” anything yet... so finding a theme for her party was tough... Our 4 year old wanted POWER RANGERS!!!  Very buyable.... but a 1 year old... not so much.

When my son was 1 we had an unconventional theme for his 1st birthday (Monster PJs), and I made a lot of the decorations with the help of my mom and my mother in law.... so I really wanted to make some of the decor for O's party as well.... 

I got fixated on a Bunting idea... like a string of pennant style banners.... 


Now... I have TONS of fabric since I’m a shameless fabric hoarder.... 
and I though maybe something girlie... how ‘bout pinks and purples...

I ran up to my sewing room and dug out zillions of fabrics... I grabbed pinks and purples as planned, but also red and yellows... tried to make sure I wasn’t missing a better idea.... but ultimately, I edited it back down to pinks and purples... with a few jolts of oddness, cuz that’s what I do...

I ironed all my fabrics (they needed to be ironed because they’re stored in drawers and bags that I’m constantly rummaging through... I ironed each “scrap” folded in half.  I knew I wanted double sided “flags” that hung by the fold... so if the fabric I chose was too small to fold in half and fit my template... I ditched it, unsentimentally.

I then folded a piece of paper in half and guestimated at what a pleasing triangle would be.  And cut!  Got myself a nice pizza-slice of a template, about 6 inches across the top and maybe 8 inches long.

Using my cutting mat and rotary cutter and straight-edge ruler thingy, I laid my template on the fold of the fabric and sliced!

I was pleased to be using up some tried and true fabrics that had previously appeared in perhaps TOO MANY of my scrappy quilts... so - YAY for using things up!


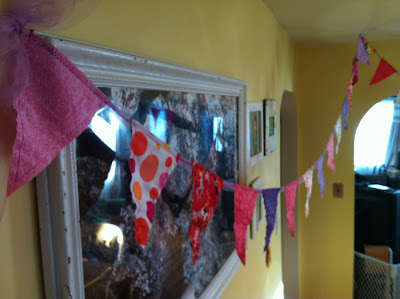
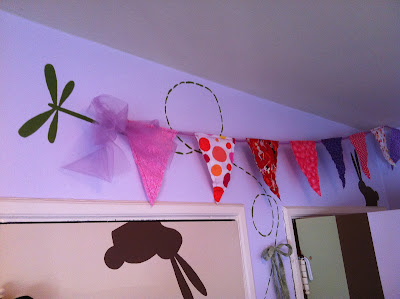
I also had 2 rolls of a tulle “ribbon” left over from saving my BFF’s wedding.  I decided that purple tulle was PERFECT for stringing my flags and then having poofy-bows at the ends!!!  


So, I scrunched up the tulle and made a “ribbon,” if you will. I pinned the flags to that “ribbon” and also pinned the point of the flags.  And I left a pleasing (yet estimated) 2? inches between flags.


I like a scrappy and shabby look, so I didn’t bother with fusing the fabrics together or worrying about raw edges.  My plan was to straight-stitch around the perimeter, and let the edges do what they wanted.... One could totally fuse or use a serger... anything goes!  (That would make a great title!)

 
So, I stitched straight down the side to the point and back up the other side... then, scrunching the tulle by hand (into a flat “ribbon”) I stitched straight across the exposed tulle and then down and up the next flag and so on.... never stopping.... kept on a’rockin’ it... FINISHED!!!


I then decided that the tops of the flags looked like an uncompleted thought... so I started at one end and zig-zagged the entire length.... across each flag, across the tulle...

BRILLIANT!

Very happy.


In the dining room, where the important moments of the party (like eating cake) would be, I used mini Command Adhesive hooks to start and stop and achieve the droopy, strung-look that I wanted....


And quite festive it Was Indeed!!!

Side note: I then gathered all sorts of pink and purple things: toys, quilts, bags, dishes.... anything girly-ish, and arranged it all lovingly around the room!  This truly made the little girlie theme come alive and proved to be a very charming and cheery space for our event!!!

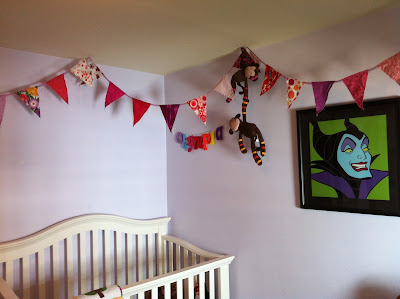
After the party, I decided to move the bunting into O’s room as a permanent fixture.... so, once again, Command Adhesive hooks, and BOOM!  This time, the story is that this little dragon fly is pulling the banner through the room!


 I love a story.

Anyway.... this took NO TIME AT ALL to make and has really got me thinking that it’s such an easy and fun and unique way to make any space or event more festive!

I’m already thinking Greens for an Outdoor Garden Party... 

And a FABULOUS way to thin out your scrap-stash!!!

One could use pre-maid binding as the “string” or even cord or yarn or leave no space between flags and just chain-piece.  One could alternate the size of the flags...

I mean..... OH, THE POSSIBILITIES!!!!!!!

Enjoy!
GD*BG

Saturday, January 26, 2013

Rolo Brownies


Yes you did read that right! Rolo Brownies!

Stand by...here comes a cookery step by step blog.

First of all I should say that I have no idea if Rolo's are available anywhere else in the world apart from the UK, so for anyone reading this who is not familiar with the Rolo they are a small individual caramel centred chocolate, if you have access to something fitting that description you could use those instead. A packet of Rolo's look like this, (just in case you're wondering!)


As you can see from the top picture above I have this recipe written down, how very old skool!  I have no idea where it originally came from but once created it is sweet chocolatey heaven!

Now....ingredients....you'll need:

1 square cake tin measuring 20cm (8 inches) per side

100g of dark chocolate. (I used 74% cocoa but it's up to you, use what you like)

2 eggs

2 packets of Rolo's (or 16 individual caramel chocolates)

75g unsalted butter

150g caster sugar

Half a teaspoon Vanilla Extract

58g plain flour

Half a teaspoon Baking Powder

Salt - just a pinch!

Ok, got these?
Then here's what you do:

Pre-heat your oven to 170 degrees C

Break the chocolate into an ovenproof bowl and then measure the butter cut it into bits and add this into the bowl with the chocolate and put it in the oven so these two ingredients melt together while the oven is heating up. Keep an eye on it!

While the melting of chocolate and butter is happening in the oven line your tin with baking paper.

Then in a mixing bowl cream together the eggs, sugar and vanilla essence with an electric mixer until they are all combined and light and fluffy looking.

Is the butter and chocolate melted together? Yes? Then take it out of the oven and let it cool down a bit. Do NOT just tip it straight into the eggs and sugar as it may possibly turn the eggs to scrambled eggs (not nice)! So once it's cooled a bit pour it into the eggs and sugar mix and mix again with the electric whisk until everything is nicely combined.

Then measure out the flour, baking powder and salt and sieve these onto the top of the chocolately egg mix. This time use a metal spoon or spatular and fold the flour into the chocolatey mix. Fold until everything is mixed together nicely, no flour left showing, then STOP! Don't over mix!

Pour this into your tin.

Now the fun bit. Open your packets of Rolo's and place them on top of the mix in a 4 x 4 pattern. Like this:

And just let them sink into the mix. Like they're sinking in a chocolate swamp!
I actually pushed my Rolo's into the mixture, upon reflection I wouldn't do this, just let them sink in.

Then pop this in the oven and set your timer for 25 minutes.

Now do the washing up while they're baking!


When your timer buzzes, check to see if they are cooked. I do this by inserting a wooden skewer into the centre and if it comes out with a bit of the mix attached...they're done! The skewer doesn't want to have uncooked wet looking mix on it, if that happens put them back in for another 5 minutes. Nor does the skewer wasn't to come out with no mix on it - then the brownies are basically cake! It's a fine line to know when they're done...but be brave, you'll know!

Leave to cool a bit in the tin on a wire rack then when you can touch the tin, turn out and peel off the baking paper, and turn back over onto the rack to cool completely.

I'm not going to lie I could not wait for them to cool completely, come on the smell of warm chocolately yumminess was too much! So I cut them up while still warm, made a cup of tea and did some quality control!

Here's the exterior and interior shots!


See how you can't see the Rolo? Just a little dimple in the top! So when you bite into it and discover the surprise caramel centre...oh the joy!


Now, a quick "post script": remember I said don't press the Rolo's into the mix? Well if you do this is what happens! They touch the bottom and when you peel off the baking sheet you take off the bottom of the Rolo and when you flip them back over the caramel runs out! Not good. But panic not, if this happens just scrape the missing bit off the baking sheet with a spatular and put it back where it should be! As they cool the caramel will stick back together again. Plus it'll be underneath, nobody will ever know, your secret is safe!


Please leave a comment on this blog if you give these a try and let me know how they turned out.

Happy Baking!

GD*BG


Sunday, January 13, 2013

A New Year.


It's been a while but we're still here creating new things to share with you.

More soon!
GD*BG

Tuesday, August 21, 2012

Zebra cake.

Yeah you did read that correctly! Don't panic though, it doesn't contain Zebras!!

In the hiatus between the awesome Olympics tv coverage finishing in the UK (the whole country seems to be in a sort of sporting limbo!) and the Paralympics starting, the foodie programmes have begun; a sure sign autumn is approaching!

One of the new generation of tv chefs is the gorgeous Lorraine Pascale, her new series (her second I believe) started last week and in the first episode was her "Crouching Tiger Hidden Zebra Cake" here's a link to the recipe. Of course I'm always up for a baking challenge and so was super excited to see this one on the show.

The recipe is enough to make two round 20cm diameter cakes. I a) don't have two 20cm cake tins and b) only really wanted to make one cake as if it turned into a disaster I hadn't wasted too many ingredients or too much money. So I figured...I'll just halve all the ingredients thus making enough for just one cake. Then I got paranoid that maybe that's not what you're supposed to do.... I know I'll Tweet Lorraine herself and ask - I never expected to get a reply but at least I'd have tried to find out if halving the quantities was ok. Holy cake batter I got a reply! She said "unfortunately not really....:(" What? Why? Oh what the heck, I'm too excited at the prospect of making a stripy cake....I'm doing it anyway.

Turns out it was fine!

This is the batter in the tin ready to go in the oven. I didn't think to take pics to blog this until I got to this point, sort of convinced that because Lorraine had said it wouldn't work, well, it wouldn't. But once I got to this stage and it almost looked right I decided it may just work!

The batter.

Then there's always that moment that you dare to look in the oven (or is that just me?) when it's baking....just to check it's working! It was..see:


 The oven 

Cooked and out of the oven to cool...still looks ok!


 I don't normally cut my cakes completely in half buy it was the only way to see if it had worked. 
Not bad for a first attempt I'd say.


It went down very well with a cup of tea, sat in the parents garden, in the sunshine. 


One thing not mentioned on the recipe, but Lorraine did on the tv, is that she put the batter mixes in piping bags (instead of using spoonfuls as the recipe states) and piped big dots one on top of the other. So I did that too.  (I was ambidextrous piping - don't ask - it was messy!) That's why my mix in the tin looks a bit swirly, it's amazing how much the "centre dot" moves around the tin as you pipe one onto the next. When I have another attempt at this, oh yes there will definitely be another! I will try and keep it more central so the stripes in the cake are more defined.

"The Great British Bake Off" is this evening foodie tv viewing choice, then "The Hairy Dieters" I do love a good foodie programme!

If you give this zebra cake a go, please post a comment on here and let me know how you get on.
Happy baking!

GD*BG