Birthday Bunting!
So... my daughter, Olympia, just turned 1!!
A 1 year old isn’t really “into” anything yet... so finding a theme for her party was tough... Our 4 year old wanted POWER RANGERS!!! Very buyable.... but a 1 year old... not so much.
When my son was 1 we had an unconventional theme for his 1st birthday (Monster PJs), and I made a lot of the decorations with the help of my mom and my mother in law.... so I really wanted to make some of the decor for O's party as well....
I got fixated on a Bunting idea... like a string of pennant style banners....
Now... I have TONS of fabric since I’m a shameless fabric hoarder....
and I though maybe something girlie... how ‘bout pinks and purples...
I ran up to my sewing room and dug out zillions of fabrics... I grabbed pinks and purples as planned, but also red and yellows... tried to make sure I wasn’t missing a better idea.... but ultimately, I edited it back down to pinks and purples... with a few jolts of oddness, cuz that’s what I do...
I ironed all my fabrics (they needed to be ironed because they’re stored in drawers and bags that I’m constantly rummaging through... I ironed each “scrap” folded in half. I knew I wanted double sided “flags” that hung by the fold... so if the fabric I chose was too small to fold in half and fit my template... I ditched it, unsentimentally.
I then folded a piece of paper in half and guestimated at what a pleasing triangle would be. And cut! Got myself a nice pizza-slice of a template, about 6 inches across the top and maybe 8 inches long.
Using my cutting mat and rotary cutter and straight-edge ruler thingy, I laid my template on the fold of the fabric and sliced!
 I was pleased to be using up some tried and true fabrics that had previously appeared in perhaps TOO MANY of my scrappy quilts... so - YAY for using things up!
I also had 2 rolls of a tulle “ribbon” left over from saving my BFF’s wedding. I decided that purple tulle was PERFECT for stringing my flags and then having poofy-bows at the ends!!!
So, I scrunched up the tulle and made a “ribbon,” if you will. I pinned the flags to that “ribbon” and also pinned the point of the flags. And I left a pleasing (yet estimated) 2? inches between flags.
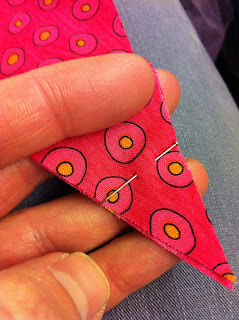
I like a scrappy and shabby look, so I didn’t bother with fusing the fabrics together or worrying about raw edges. My plan was to straight-stitch around the perimeter, and let the edges do what they wanted.... One could totally fuse or use a serger... anything goes! (That would make a great title!)


So, I stitched straight down the side to the point and back up the other side... then, scrunching the tulle by hand (into a flat “ribbon”) I stitched straight across the exposed tulle and then down and up the next flag and so on.... never stopping.... kept on a’rockin’ it... FINISHED!!!
I then decided that the tops of the flags looked like an uncompleted thought... so I started at one end and zig-zagged the entire length.... across each flag, across the tulle...
BRILLIANT!
Very happy.
In the dining room, where the important moments of the party (like eating cake) would be, I used mini Command Adhesive hooks to start and stop and achieve the droopy, strung-look that I wanted....
And quite festive it Was Indeed!!!
Side note: I then gathered all sorts of pink and purple things: toys, quilts, bags, dishes.... anything girly-ish, and arranged it all lovingly around the room! This truly made the little girlie theme come alive and proved to be a very charming and cheery space for our event!!!
After the party, I decided to move the bunting into O’s room as a permanent fixture.... so, once again, Command Adhesive hooks, and BOOM! This time, the story is that this little dragon fly is pulling the banner through the room!
I love a story.
Anyway.... this took NO TIME AT ALL to make and has really got me thinking that it’s such an easy and fun and unique way to make any space or event more festive!
I’m already thinking Greens for an Outdoor Garden Party...
And a FABULOUS way to thin out your scrap-stash!!!
One could use pre-maid binding as the “string” or even cord or yarn or leave no space between flags and just chain-piece. One could alternate the size of the flags...
I mean..... OH, THE POSSIBILITIES!!!!!!!
Enjoy!
GD*BG


